Publication date of the original Japanese article: 2021-05-04 11:59 (JST)
Translated by. Sachi Salehi
We continue our insights into how to use photo modes in games, which are brought to you by our dance photographer author. Following the previous installment on AOV and composition, this edition will go over focus and the bokeh effect (i.e. blurring the background/objects).
By understanding the settings and conditions that help achieve a blurred background, you too can master the bokeh effect. As a note, we’d like to remind you that these tips are geared specifically towards photo mode captures in video games.
Related Articles:
Understanding Angle of View & composition
How to adjust brightness and colors with retouching

For most games, it’s common for objects in the background to have high visibility during gameplay; in other words, the background is not too blurred out. On the other hand, in cutscenes the background is often blurred during scenes such as closeups. By blurring the background in photo mode, you can create a film-esque background unlike anything you would see during usual gameplay.
The bokeh effect is essentially when things that are out of focus appear blurred. In contrast, the parts that appear clearly are in focus. Our eyes naturally gravitate towards things that are in focus; by blurring the background, you can put the spotlight on your main subject.
The two conditions for a bokeh effect – No.1 : Aperture
There are two main conditions for achieving a blurred background; you must be mindful of: 1. Aperture settings, and 2. The distance between the subject and background. The first, aperture settings, can be adjusted even after deciding on the composition. However, it is better to consider the second point of subject-background distance before entering into photo mode.
Aperture is a setting value that controls the amount of blur*. Specifically, it controls how much of the image is in focus and visible. The area that is in focus and visible is known as the depth of field. As this area becomes narrower, less of the image is in focus (i.e. more of the image will be blurred).
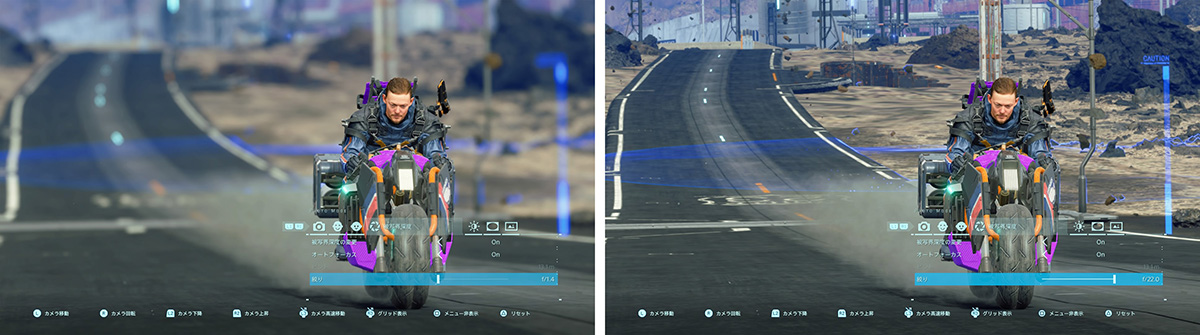
The name of this aperture setting can vary between games and can be labeled as “Depth of Field”. It can also be displayed as a number with an “F” before it, for example “F2.8”. If your setting is labeled as “Aperture” or “F-Stop”, the lower the setting the narrower the depth of field will be (larger area of blur). This type of aperture setting is used in photo modes across various titles, including Ghost of Tsushima, Death Stranding, Cyberpunk 2077, Horizon Zero Dawn, and Control.
*In actual photography, aperture relates to the brightness of photos as well. However, it does not affect brightness in video game photo modes, therefore can be thought simply of as a setting that controls depth of field.
In titles such as Assassin’s Creed Valhalla and The Last of Us Part II, which label this setting as “Depth of Field” or “Strength (as a setting under Depth of Field)”, the higher the value the narrower the depth of field.
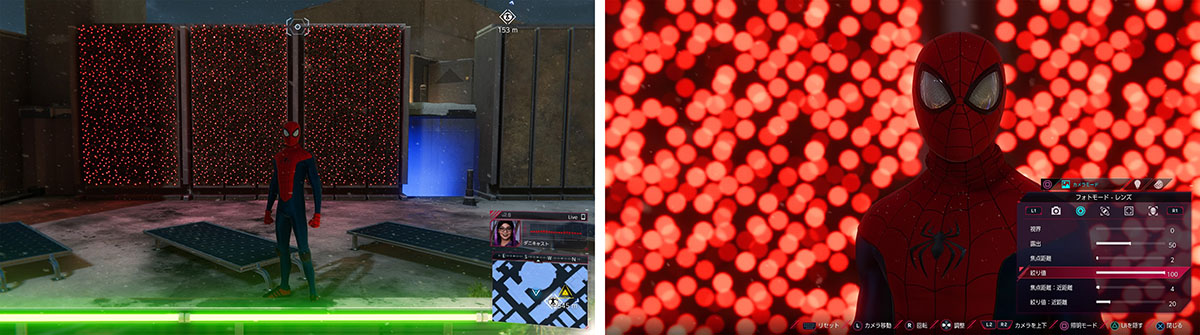
Some examples that do not fall under either of these types (as far as the author knows) include the settings found in Marvel’s Spider-Man and Marvel’s Spider-Man: Miles Morales. These titles have unique settings for aperture and depth of field, which we will go into further in the upcoming section on distance.
The two conditions for a bokeh effect – No.2 : Distance
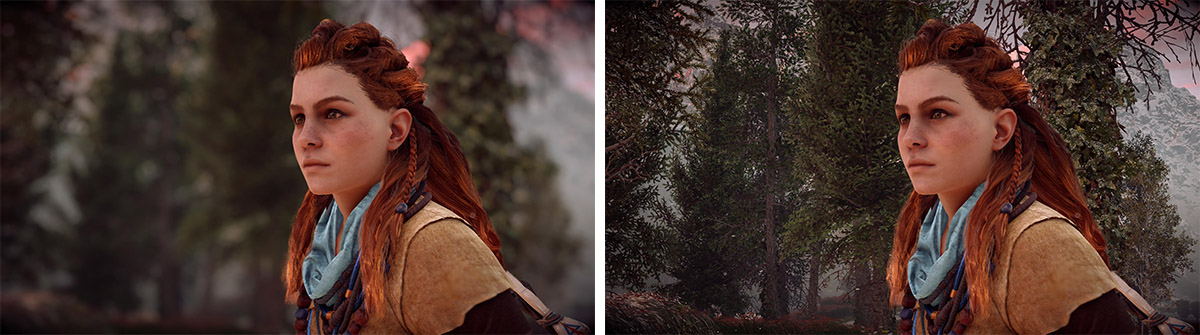
Next, we will go over the second condition for a successful background blur: distance between objects. The farther the distance between the subject and the background, the easier it is to achieve a blurred background. This is because the bokeh effect can occur more easily when there is a greater distance from the point of focus. The images below can help you visualize the amount of distance to consider.

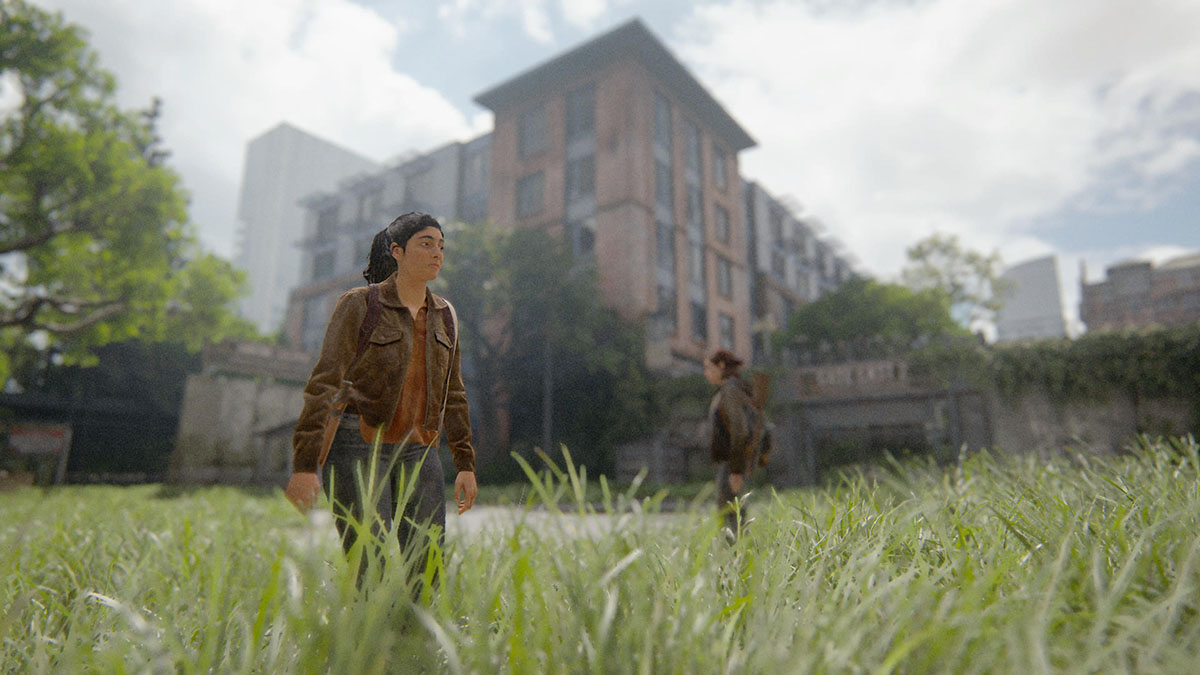

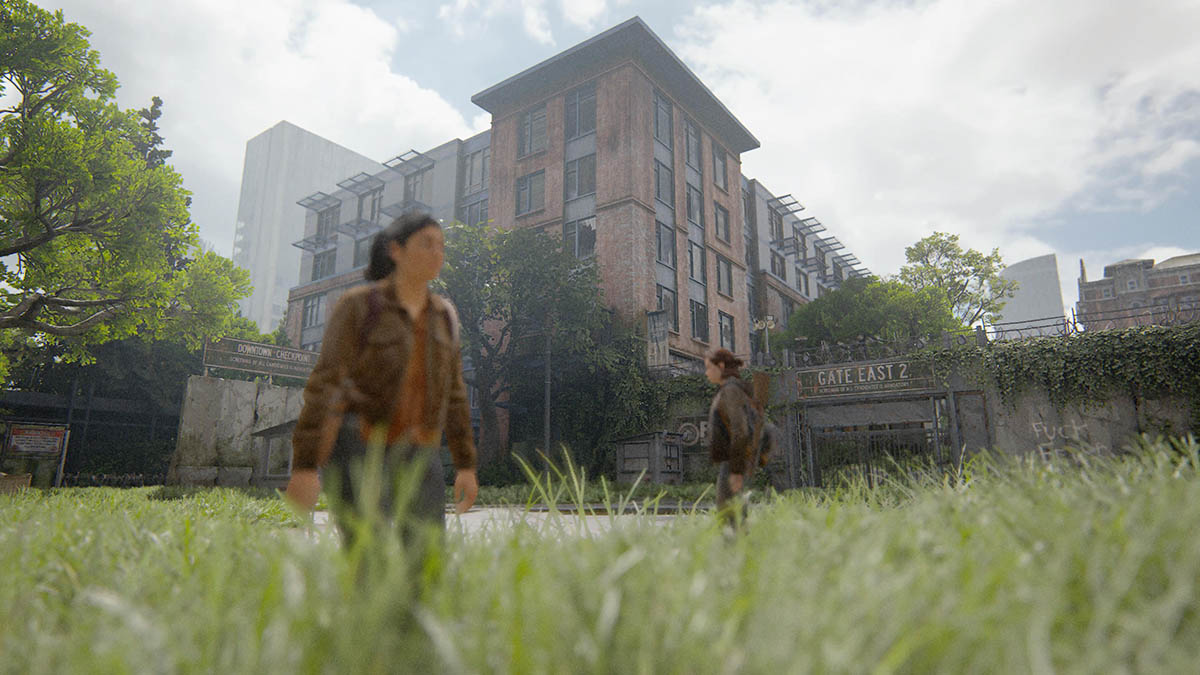
Each of these images has the same value for the f-stop, however the focus point has been adjusted from the front to the back. In the lower images, you can see that the grass on the sides of the person in focus is in focus as well. Items that are horizontally aligned with the point of focus appear crisp, while anything in front or behind ends up blurred. It may help to think of depth of field in photo modes as a band spanning across the image*.
The setting that adjusts the area that is in focus and visible (the width of the band) is the aperture setting of the first condition. The second condition calls for adjusting the area you want to blur to be as far as possible from this band beforehand.
*In reality, distance is a little more complicated. The distance between the subject and the camera and angle of view are also important to achieving the bokeh effect.
In addition, while setting the focus point farther can make it difficult for the background to blur, this does not occur in some photo modes. In the photo mode of The Last of Us Part II from the example photos above, the background does become difficult to blur when placing the focus point farther from the camera.
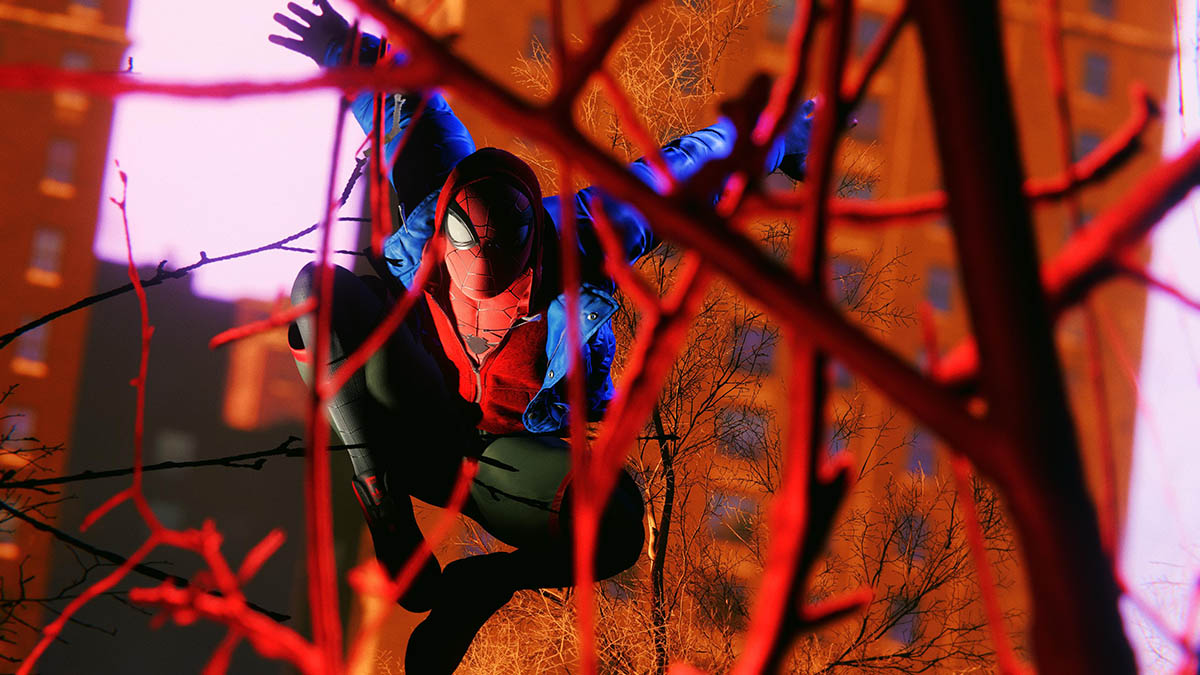
In the titles considered exceptions Marvel’s Spider-Man and Marvel’s Spider-Man: Miles Morales, there are separate settings to adjust the strength of the blur effect and the area in focus, and no setting related to adjusting the focus itself. In addition, the depth of field was not in a band, but rather it spread farther as the value increased. These settings are quite unconventional in that objects within that area don’t blur even when adjusting the aperture settings.
There are also settings specifically for objects closer to the camera in Marvel’s Spider-Man: Miles Morales, and the strength of blur and area of focus can each be adjusted as well. By utilizing these settings, the bokeh effect can also be created in the focused area. These settings work well for fine-tuning just the close-up areas and may be a nice bonus for those who want to craft a photogenic foreground bokeh (blurring objects closer to the camera than the subject).
How to adjust focus
The settings for adjusting focus can be generalized into two categories. Those that display focus as distance, and those that call for designating a specific position on-screen. Though most games fall into the first category, some titles such as Assassin’s Creed Valhalla fall into the latter.
In settings that display distance, you can set the distance between the camera to your desired point of focus in increments, such as “m (meters)”. This type of setting allows for moving forward and back the “band of visible area in focus” as shown in the sample images of condition two.

The smaller the value of the aperture setting (narrow area of focus), the harder it is to adjust focus. However, if your game’s photo mode includes an “auto-focus” feature, the main character’s face should constantly be in focus. It can be great for those who want to take shots of the protagonist. For the second type in which you would designate a specific position, adjusting focus can be as easy as placing the cursor on the area you want to be in focus.
Types of scenes suited for background blur
Some scenes where a background blur may be called for include those in which characters or monsters, essentially the object you want to capture, are clearly in view. This is because you can cut off the background from the “star” and guide the viewer’s gaze towards your subject. By choosing backgrounds that have glowing areas, a main light source, or lights scattered throughout, you can blur these to create an effervescent looking background.
On the other hand, even if you are photographing people, if you would like to clearly show what is in the background you should have a light hand with the blur. In images where the buildings, town, or general area that the subject is in is significant, the photo turns out better when the background is crisp and clear.
For shots of the scenery, or when you want a stiffer look, avoiding blur and photographing even the farthest objects clearly will result in better captures. To achieve crisp shots, you can do the opposite of blurring by increasing the f-stop value.
In most cases, a narrow angle of view (zooming in more) is better for creating a bokeh effect on the background. However, in the author’s tests across multiple titles, there was not much difference in adjusting the angle of view (titles tested include Ghost of Tsushima, The Last of Us Part II, Cyberpunk 2077, Control, and Forza Horizon 4.).


By slightly adjusting the f-stop value between shots, you can compare and choose the perfect shot
In this article, we covered controlling the amount of “blur” by adjusting the area visible and in focus to bring more attention to the star of the screen. Blurring as much as you can is not always the right answer; you will find that deciding how much blur to use changes each time. We recommend playing with settings and taking various shots, picking the best later on.
In the next installment we plan to cover brightness and how lighting can change the impression your captures give off.
Related Articles:
Understanding Angle of View & composition
How to adjust brightness and colors with retouching