シンギュラリティは近い……ゲームAIの初歩の初歩 – PICO-8ゲーム開発入門(10)
PICO-8でプログラミングを1から学ぶ連載、第10回のテーマは「ゲームAIの初歩の初歩」です。目的は、キャラクターの処理を共通化することと、AIによってNPCがPCを追いかけるようにさせてみることです。
PICO-8でプログラミングを1から学ぶ連載、第10回です。前回はこちら。プログラミング経験者の方は、日本語マニュアルを読んで、すぐに創作にとりかかりましょう。作った作品は、ぜひ掲示板へ。
前回、トマトケチャップをぶっ放す銃を実装しました。次に、ビームを浴びせられることになる、かわいそうな敵キャラクター(ノン・プレイヤー・キャラクター = NPC)たちを作りましょう。
今回のゴール
・NPCをプレイヤー・キャラクター(PC)と同様の処理で表示させる。
・AIによって、NPCがPCを追いかけるようにさせる。
まず、NPCの絵を描いてみます。こんな感じ。
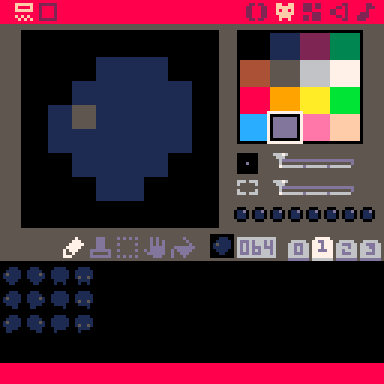
NPCは、スプライトシートのタブ「1」に描いてみました。左上のスプライトの番号は64です。
AIを作る作業に入る前に、まずPCとNPCを表示・更新する処理を組み上げましょう。前回までに作った、PCを表示・更新するプログラムを整理して作ります。
キャラクターの処理を共通化
PC/NPCともに、表示したり動かす処理のほとんどは共通化できます。PCとNPCの決定的な違いは、PCはプレイヤーが操作し、NPCはゲームのプログラム(AI)が操作する、という点です。
PCもNPCも、テーブルによって表現します。これまでは、PCのテーブルをソースコードの冒頭で作っていました。今回はその処理を、PC/NPC共通のキャラクターのテーブルを作る関数、create_character() にまとめます。
function create_character(x, y, s0)
 local c={}
 c.x=x -- X座標
 c.y=y -- Y座標
 c.s=s0 -- 左上のスプライト番号
 c.s0=s0
 c.d=4
 c.dx=0
 c.dy=1
 c.spd=2
 c.walking=false
 return c
end
引数の x, y は座標です。s0 は、そのキャラクター用のスプライトシートの左上のスプライトの番号です。
この関数を使って、NPCを作る処理は以下のようになります。
npcs={}

function add_npc(x, y)
 add(npcs, create_character(x, y, 64))
end
プレイヤーが操るPCとは異なり、NPCは複数います。npcsは複数のNPCが入る配列です。add_npc() は、NPCを1体生成して npcs に追加する関数です。_init() などからNPCを置く座標とともに呼び出します。
これに対して、PCを作る処理は以下のようになります。
pc={}

function init_pc()
 pc=create_character(64, 64, 1)
 pc.gun=false -- 銃を撃っている状態かどうか
 pc.gun_interval=0 -- 次に銃が使えるまでの待ちフレーム数
end
PCは1体だけです。npcs と変数の宣言のしかたは同じですが、変数 pc は配列ではなくテーブル1個ぶんです。init_pc() 関数では、create_character() で生成したテーブルを pc にそのまま代入しています。
PCはNPCと異なり銃を撃てるので、そのぶんテーブルに持たせる情報も多くなります。それらは、create_character() で生成したテーブルをpc変数に入れたあとに追加しています。
コードの全貌はこちら:
--- constants
ipf=8 -- interval per frame
nf=2 -- number of frames
max_gun_interval=8
beam_spd=4
beam_len=4
beam_life=64
--- variables
t=0
pc={}
beams={}
npcs={}
--- characters
function create_character(x, y, s0)
local c={}
c.x=x
c.y=y
c.s=s0
c.s0=s0
c.d=4
c.dx=0
c.dy=1
c.spd=2
c.walking=false
return c
end
function update_c(c)
-- sprite
c.s=(c.d-1)+c.s0
if c.walking then
c.s+=flr((t%(nf*ipf))/ipf+1)*16
end
if c==pc and c.gun then
c.s+=4
end
-- position
if c.walking then
c.x=c.x+c.dx*c.spd
c.y=c.y+c.dy*c.spd
end
end
function draw_c(c)
spr(c.s,c.x-4,c.y-4)
end
function collide_with_other_npcs(c, x, y, r)
for other in all(npcs) do
if c~=other and collision(x, y, other.x, other.y, r) then
return true
end
end
return false
end
--- npcs
function add_npc(x, y)
add(npcs, create_character(x, y, 64))
end
function update_npc(n)
update_c(n)
end
--- pc
function init_pc()
pc=create_character(64, 64, 1)
pc.gun=false
pc.gun_interval=0
end
function update_pc()
update_c(pc)
if pc.gun_interval>0 then
pc.gun_interval-=1
end
end
--- beams
function add_beam(x, y, dx, dy)
local b={}
b.x=x
b.y=y
b.dx=dx
b.dy=dy
b.life=beam_life
add(beams, b)
end
function update_beam(b)
b.x+=b.dx*beam_spd
b.y+=b.dy*beam_spd
b.life-=1
if b.life<=0 then del(beam, b) end
end
function draw_beam(b)
line(b.x+b.dx*beam_len, b.y+b.dy*beam_len, b.x, b.y, 8)
end
---
function input()
-- walk
pc.walking=false
if btn(0) then
pc.dx=-1
pc.dy=0
pc.d=1
pc.walking=true
end
if btn(1) then
pc.dx=1
pc.dy=0
pc.d=2
pc.walking=true
end
if btn(2) then
pc.dx=0
pc.dy=-1
pc.d=3
pc.walking=true
end
if btn(3) then
pc.dx=0
pc.dy=1
pc.d=4
pc.walking=true
end
-- gun
pc.gun=btn(4)
if pc.gun and pc.gun_interval==0 then
local bx=pc.x
local by=pc.y
if pc.d==1 then
bx-=3
by+=1
elseif pc.d==2 then
bx+=2
by+=1
elseif pc.d==3 then
bx+=2
by-=2
else
bx-=3
end
add_beam(bx, by, pc.dx, pc.dy)
pc.gun_interval=max_gun_interval
end
end
---
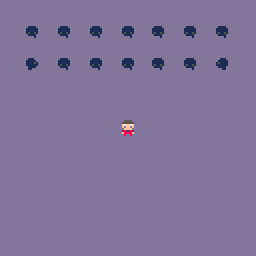
function _init()
init_pc()
for y=1,2 do
for x=1,7 do
add_npc(x*16,y*16)
end
end
end
function _update()
t+=1
input()
update_pc()
foreach(npcs, update_npc)
foreach(beams, update_beam)
end
function _draw()
rectfill(0,0,127,127,13)
draw_c(pc)
foreach(npcs, draw_c)
foreach(beams, draw_beam)
end
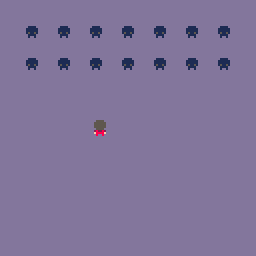
これを動かしてみると、こんな感じです:
AIを作る
NPCを操作する処理のことは、AIと呼ばれます。AIとはArtificial Intelligence(=人工知能)の略です。AIというと、高度な技術に聞こえますが、ゲームの世界ではさほど複雑なプログラムでなくとも、NPCを動かしている処理はAIと呼ばれることがあります。
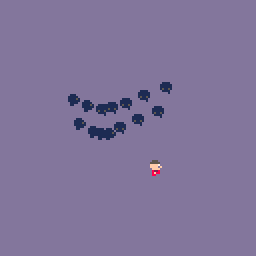
PCを追いかける
PCを追いかけるAIを作ってみます。たんにPCの方向に向かっていくだけの、簡単な処理です。NPCから見たPCの方向を計算して、その方向に毎フレームちょっとずつ移動していく、単純なルールです。
以下の関数を追加します。
function follow_pc(n)
 n.walking=true -- "歩き"状態にする
 n.spd=0.5 -- 少しスピードを遅めに
 local dx = pc.x-n.x
 local dy = pc.y-n.y
 local dist = distance(pc.x, pc.y, n.x, n.y)
 n.dx = dx/dist
 n.dy = dy/dist
end
引数の n は、NPC1つぶんのテーブルです。今までに作ってあるプログラムにより、n.walkingをtrueにしてから n.dx / n.dy に単位方向ベクトルの値を入れさえすれば、NPCは歩き出します。単位方向ベクトルは、NPCの向いている方向を表します。(このあたりの仕組みについては、第9回でも説明しています)。
単位方向ベクトルのX成分/Y成分は、下記の式で計算できます。
X成分 = (PCのX座標 - NPCのX座標) / PCとNPCの間の距離
Y成分 = (PCのY座標 - NPCのY座標) / PCとNPCの間の距離
PCとNPCの間の距離の計算は、第7回で作った distance() 関数を使います。follow_pc() 関数は、update_npc() から呼び出します。
function update_npc(n)
 follow_pc(n)
 update_c(n)
end
キャラクターの位置を更新する update_c() の前に follor_pc() を呼ぶことで、毎回NPCの次の向きを計算して更新します。動かしてみると、このようになります:
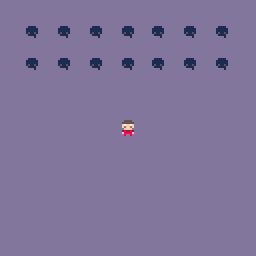
わらわらと、使い魔たちがPCを追いかけます。ただ、どの方向へ向かうときも、ずっと下の方向を向いてますね。
向きによってスプライトを変える
キャラクターのテーブルの要素 d に(1, 2, 3, 4)のいずれかを入れれば、対応する(左、右、上、下)の方向を向きます。PCの場合は、押された方向キーに対応した方向に向くだけなので簡単です。しかしNPCの場合は、4方向ではなく、360°に移動の自由度があります。
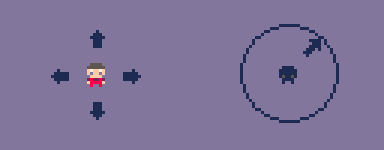
キャラクターのスプライトは4方向ぶんしか用意していないので、360°の自由度がある方向を、4方向のどれかに割り当てることにしましょう。三角関数(sin, cos, tan...)を使って向きの角度を計算する方法もありますが、今回は三角関数無しでやってみます。
function face_pc(n)
 if abs(n.dx)>abs(n.dy) then
  if n.dx<0 then n.d=1 end
  if n.dx>0 then n.d=2 end
 else
  if n.dy<0 then n.d=3 end
  if n.dy>0 then n.d=4 end
 end
end
これは、follow_pc() と同じく update_npc() で呼び出す関数で、引数 n はNPC1つぶんのテーブルです。まずNPCの単位方向ベクトルのX方向 / Y方向それぞれの大きさを調べて、X方向 / Y方向のどちらへの動きの方が大きいかを調べます。abs() はPICO-8独自の関数で、数の絶対値を計算します。abs(3)は3、abs(-3)も3です。
次に、移動量の大きい方の方向について、顔を向ける向きを決定します。X方向の移動量が大きかった場合、単位方向ベクトルのX成分(n.dx)が負なら左、正なら右に向きます。
この関数は、単位方向ベクトルを決定する follor_pc() のあとに呼び出しましょう。
function update_npc(n)
 follow_pc(n)
 face_pc(n)
 update_c(n)
end
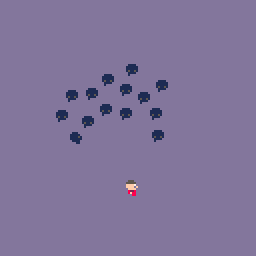
NPCどうし重ならないようにする
もう一手間加えましょう。今のままでは、ずっと動かしていくうちに、NPCが1箇所にかたまるようになってしまいます。
これは、NPCどうしが重なることができるからです。重ならないようにするには、衝突判定のロジックを使います。update_c() でNPCの新しい座標を計算・更新するとき、もしその座標にほかのNPCが居たら移動をやめる、という処理を加えます。
まず、新しい座標にほかのNPCが居るかどうか調べる関数を作ります。
function collide_with_other_npcs(c, x, y, r)
 for other in all(npcs) do
  if c~=other and collision(x, y, other.x, other.y, r) then
   return true
  end
 end
 return false
end
引数 c はNPC1つぶんのテーブル、x, y は新しい座標、r は衝突判定の半径です。引数で与えられたNPCの新しい座標が、ほかのすべてのNPCとぶつかっていないか調べます。ぶつかっていたら true、そうでなければ false を返します。collision() は第7回に作った衝突判定の関数です。
以下の文では、and を使って2つの条件を組み合わせています。
if c~=other and collision(x, y, other.x, other.y, r) then
andは「~かつ~」の意味で、c ~= other と collision(x, y, other.x, other.y, r) が両方とも true のとき、trueになります。(このようなキーワードを論理演算子と呼び、ほかに「~または~」の意味の or と、「~ではない」の意味の not があります。)
また、c ~= other の~=は == の逆の意味で、a ~= b ならば、aはbではないということです。npcs には引数のNPC自身も含まれるので、自分自身との衝突判定をしないように、この条件を加えています。
collide_with_other_npcs() は update_c() から呼び出します。
function update_c(c)
 (略)
 -- position
 if c.walking then
  local nx=c.x+c.dx*c.spd
  local ny=c.y+c.dy*c.spd
  if c == pc or not collide_with_other_npcs(c, nx, ny, 6) then
   c.x=nx
   c.y=ny
  end
 end
end
いままでは新しい座標を計算したら、すぐに x, y 要素を更新していました。今回は、ほかのNPCとの衝突を検知した場合は、更新をやめるようにしています。(PCの場合は衝突判定をしないので、c == pc の条件を加えています。)

かたまらずに群れるようになりました。
collide_with_other_npcs() の第4引数は、衝突の半径です。この値を大きくすると、NPCたちは間隔をあけるようになります。
いろいろ数値を変えて試してみると、面白いかもしれません。最終的なコードは以下のとおりです。
--- constants

ipf=8 -- interval per frame
nf=2 -- number of frames
max_gun_interval=8

beam_spd=4
beam_len=4
beam_life=64

--- variables

t=0

pc={}
beams={}
npcs={}

--- common functions

function distance(x1,y1,x2,y2)
 return sqrt((x1-x2)^2+(y1-y2)^2)
end

function collision(x1,y1,x2,y2,r)
 return distance(x1,y1,x2,y2) < r
end

--- characters

function create_character(x, y, s0)
 local c={}
 c.x=x
 c.y=y
 c.s=s0
 c.s0=s0
 c.d=4
 c.dx=0
 c.dy=1
 c.spd=2
 c.walking=false
 return c
end

function update_c(c)
 -- sprite
 c.s=(c.d-1)+c.s0
 if c.walking then
  c.s+=flr((t%(nf*ipf))/ipf+1)*16
 end
 if c==pc and c.gun then
  c.s+=4
 end
 -- position
 if c.walking then
  local nx=c.x+c.dx*c.spd
  local ny=c.y+c.dy*c.spd
  if c == pc or not collide_with_other_npcs(c, nx, ny, 6) then
   c.x=nx
   c.y=ny
  end
 end
end

function draw_c(c)
 spr(c.s,c.x-4,c.y-4)
end

function collide_with_other_npcs(c, x, y, r)
 for other in all(npcs) do
  if c~=other and collision(x, y, other.x, other.y, r) then
   return true
  end
 end
 return false
end

--- npcs

function add_npc(x, y)
 add(npcs, create_character(x, y, 64))
end

function update_npc(n)
 follow_pc(n)
 face_pc(n)
 update_c(n)
end

function follow_pc(n)
 n.walking=true
 n.spd=0.5
 local dx=pc.x-n.x
 local dy=pc.y-n.y
 local distance=distance(pc.x, pc.y, n.x, n.y)
 n.dx=dx/distance
 n.dy=dy/distance
end

function face_pc(n)
 if abs(n.dx)>abs(n.dy) then
  if n.dx<0 then n.d=1 end
  if n.dx>0 then n.d=2 end
 else
  if n.dy<0 then n.d=3 end
  if n.dy>0 then n.d=4 end
 end
end

--- pc

function init_pc()
 pc=create_character(64, 64, 1)
 pc.gun=false
 pc.gun_interval=0
end

function update_pc()
 update_c(pc)
 if pc.gun_interval>0 then
  pc.gun_interval-=1
 end
end

--- beams

function add_beam(x, y, dx, dy)
 local b={}
 b.x=x
 b.y=y
 b.dx=dx
 b.dy=dy
 b.life=beam_life
 add(beams, b)
end

function update_beam(b)
 b.x+=b.dx*beam_spd
 b.y+=b.dy*beam_spd
 b.life-=1
 if b.life<=0 then del(beam, b) end
end

function draw_beam(b)
 line(b.x+b.dx*beam_len, b.y+b.dy*beam_len, b.x, b.y, 8)
end

---

function input()
 -- walk
 pc.walking=false
 if btn(0) then
  pc.dx=-1
  pc.dy=0
  pc.d=1
  pc.walking=true
 end
 if btn(1) then
  pc.dx=1
  pc.dy=0
  pc.d=2
  pc.walking=true
 end
 if btn(2) then
  pc.dx=0
  pc.dy=-1
  pc.d=3
  pc.walking=true
 end
 if btn(3) then
  pc.dx=0
  pc.dy=1
  pc.d=4
  pc.walking=true
 end
 -- gun
 pc.gun=btn(4)
 if pc.gun and pc.gun_interval==0 then
  local bx=pc.x
  local by=pc.y
  if pc.d==1 then
   bx-=3
   by+=1
  elseif pc.d==2 then
   bx+=2
   by+=1
  elseif pc.d==3 then
   bx+=2
   by-=2
  else
   bx-=3
  end
  add_beam(bx, by, pc.dx, pc.dy)
  pc.gun_interval=max_gun_interval
 end
end

---

function _init()
 init_pc()
 for y=1,2 do
  for x=1,7 do
   add_npc(x*16,y*16)
  end
 end
end

function _update()
 t+=1
 input()
 update_pc()
 foreach(npcs, update_npc)
 foreach(beams, update_beam)
end

function _draw()
 rectfill(0,0,127,127,13)
 draw_c(pc)
 foreach(npcs, draw_c)
 foreach(beams, draw_beam)
end
生き物の群れを率いるプログラムが完成しました!これはこれで、何らかのゲームに仕立てられそうですが、本連載ではもっと殺伐としたゲームを作っていきます。次回は、ケチャップ銃でやつらを撃ち倒せるようにします。また、戦場に障害物を置いてゲーム性に深みを加えます。
この記事にはアフィリエイトリンクが含まれる場合があります。